Open this article in your favorite AI assistant and get key insights instantly.
Introduction
In today’s mobile-first world, developing an app for the Android platform means dealing with a vast variety of devices, screen sizes, manufacturers, OS versions and user behaviours. That means ensuring your app works not just on one phone but on many configurations is critical. That’s where Android testing comes in: it’s a key process for ensuring app quality across different devices, OS versions and screen sizes.
Whether you’re launching a new app or maintaining an existing one, robust testing helps you deliver reliable mobile experiences, reduce crashes, and maintain user trust. With 2025 now fully underway, the landscape for mobile app QA is more competitive—and more complex—than ever. Smart teams are embracing automation, device-clouds, AI-assisted testing, and continuous-integration pipelines to stay ahead.
What is Android testing, and why is it important?
Android testing, at its core, involves validating an Android application’s behaviour—its functionality, usability, performance and stability—on actual or virtual devices. The goal is to ensure the app works as intended for real users, across a spectrum of conditions. For example: does the “Submit” button respond correctly? Does the app recover properly after a network drop? Does it crash on a low-RAM device?
It’s important for multiple reasons:
Functionality: You want to confirm that your app’s features behave correctly and consistently. Without testing, features can mis-behave or break silently. For example, part of the official Android docs show the distinction between local and instrumented tests to catch errors early.
Usability & stability: Beyond mere correctness, users expect smooth flows, minimal crashes and good UI experiences. Any gap can lead to bad reviews or uninstalls.
Compatibility and fragmentation: The Android ecosystem is fragmented—different manufacturers, OS versions, screen sizes and hardware. A feature that works on one device may fail on another. This is why compatibility testing is crucial.
Reducing cost and risk: Detecting issues earlier in the development cycle is cheaper and less risky than fixing them after release. Automated testing enables early, repeatable checks.
Maintaining velocity: For teams practicing continuous delivery or agile updates, strong testing allows them to move fast without sacrificing quality. As one Android-dev blog notes: regular tests “verify your app’s correctness, functional behaviour and usability before you release it publicly.”
In short: if you’re building or maintaining an Android app, investing in testing is non-optional. It underpins user satisfaction, app reputation and long-term success.
Types of Android testing
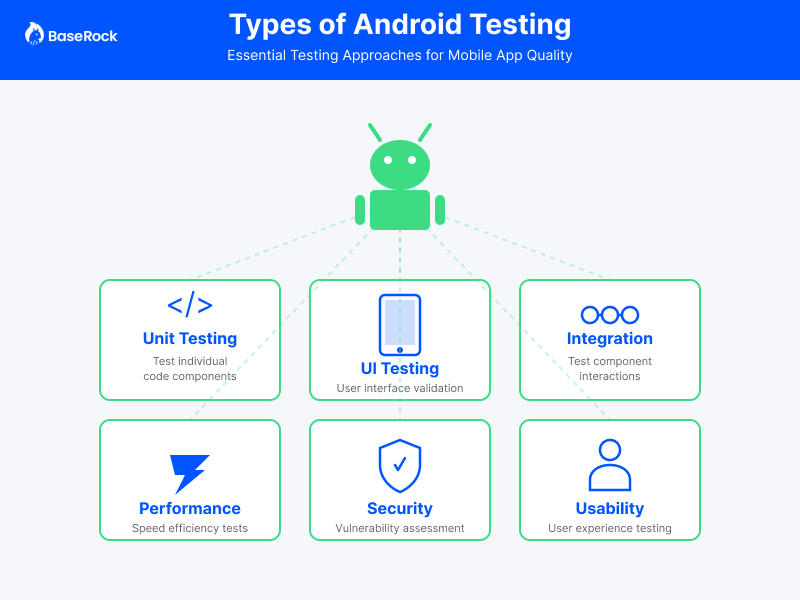
Here’s an overview of the major types of Android testing you’ll want in your toolbox:
Unit testing: Tests small units of code in isolation (e.g., a ViewModel method, utility class). These are fast, local tests and typically don’t require a device. For example, Android’s documentation describes “unit tests for ViewModels, data layer, utilities” under testable structure.
UI testing: Also called user-interface testing or end-to-end (E2E) testing. These tests simulate user interactions (taps, swipes) on screens and verify that flows work. Often run on real or emulated devices.
Integration testing: Validates interactions between components—e.g., whether a UI screen properly uses a repository, or whether an API call flows through the data layer and UI layer correctly.
Performance testing: Evaluates how the app behaves under load or constrained resources—memory, CPU, network variations, battery usage. Performance issues are often user-visible and can kill retention.
Security testing: Covers vulnerabilities, permissions misuse, data handling, and protection against attacks. With mobile apps handling more sensitive data, this is increasingly important.
Usability testing: Focuses on user experience, navigation flows, UI clarity and real-world conditions (e.g., poor network, screen rotation, accessibility). Even if the app “works,” bad UX can lead to negative feedback.
Each type serves a different purpose, but together they form a comprehensive testing strategy. For best results, you’ll want a blend of these types—both automated and manual—to ensure your Android app is robust, performant and user-friendly.
Top Android Testing Tools and Frameworks in 2025
Here are some of the leading tools and frameworks in the Android testing space (for android testing, android automation testing, android testing tools) and how they compare:
Espresso (by Google): A native Android UI-testing framework that integrates with Android Studio. Best for in-app UI flows, quick feedback loops and Android-specific automation. Strengths: Tight integration with Android APIs, predictable synchronization, good for developers writing UI tests. Ideal scenario: You’re building a pure Android app and want UI tests that run fast during development.
Appium: A cross-platform automation tool (Android & iOS) based on WebDriver. Supports native, hybrid and mobile-web apps. Strengths: One framework for both iOS and Android, supports many languages, good for enterprises. Ideal scenario: You have both Android and iOS versions and want unified automation or reuse of scripts.
Robotium: An older Android testing framework focused on functional and system testing. Strengths: Good legacy support, simple API. Ideal scenario: You have older Android apps, or want quick automation for existing flows.
UI Automator: Designed for system-level UI testing across apps/components and OS features (e.g., notifications, system dialogs). Strengths: Can interact with multiple apps, device settings. Ideal scenario: You want to test beyond your app—permissions flows, OS interactions, device-wide behaviour.
Detox: Emerging automation framework more common in React Native/Electron apps, but supports Android too. Strengths: JavaScript-based, good for teams using JS stack and wanting automation in same language. Ideal scenario: You’ve built your Android app with React Native (or similar) and want the same test stack.
When selecting tools, think of your stack, your team’s skill-set, the scale of devices you need to cover and whether you need true cross-platform capability. For “android testing tools” and “android automation testing” strategies in 2025, mixing native frameworks with cross-platform solutions often yields the best results.
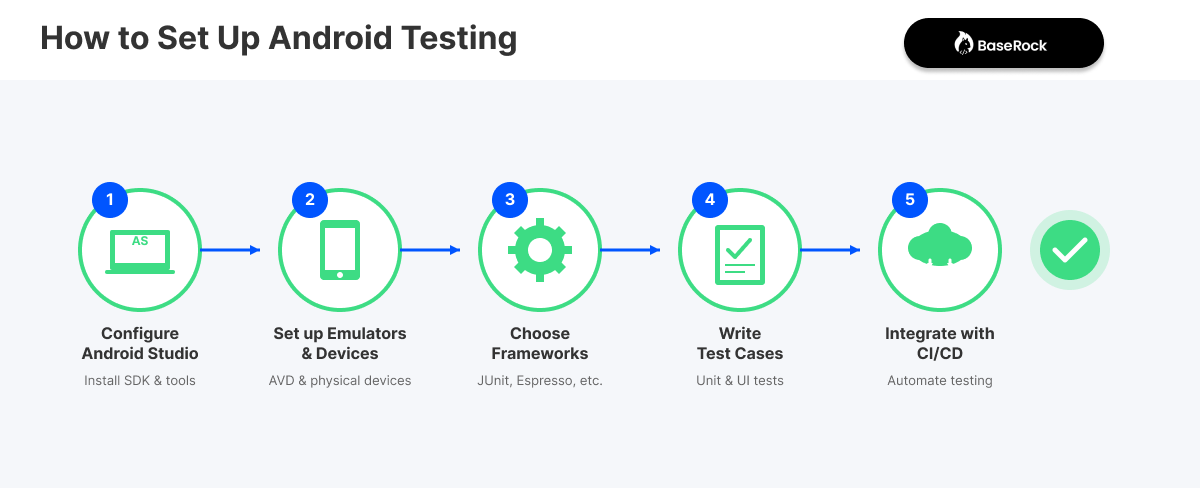
How to Set Up Android Testing
Here’s a step-by-step overview to get your android testing environment up and running:
Configure Android Studio
Install Android Studio and the Android SDK.
Use a test-able architecture (separating UI, logic and data layers) so tests are easier to write and maintain.
Create test directories: typically src/test/java/ for unit tests and src/androidTest/java/ for instrumented/device tests.
Set up devices/emulators
Create Android Emulator images covering different API levels, screen sizes, and form-factors.
Use real devices (physical phones/tablets) for coverage of OEM quirks, hardware sensors & real-world behaviour.
Decide on whether you’ll use a device-cloud (for broader device matrix) or local.
Choose your testing frameworks
Select framework(s) based on your stack (Espresso, UI Automator, Appium, Detox etc).
Add dependencies in build.gradle. For example, include AndroidX Test libraries for instrumented tests.
Write sample test cases
Unit test example: test a ViewModel method returns correct data.
UI test example: simulate a login button tap and verify home screen is shown.
Use emulators and real devices to cover both local and instrumented tests.
For example, Android docs mention “Instrumented tests run on an Android device, either physical or emulated. Local tests execute on your development machine.”
Integrate tests into CI/CD pipelines
Use tools like Jenkins, GitHub Actions, GitLab CI or Bitrise to run tests on code push.
Automate test execution across emulators or device cloud.
Configure failure thresholds, reporting (screenshots, logs) and test coverage metrics.
Ensure your pipeline includes test jobs before deployment, so you catch regressions early.
By following these steps, you’ll set up a solid foundation for “android testing” and “android automation testing” in your project. Over time, you can scale device coverage, add performance/security tests, and tighten your release-quality workflow.
Android Testing Best Practices
Here are some actionable best practices to improve your Android testing efficiency and effectiveness:
Maintain modular and readable test cases: Avoid monolithic tests. Break tests into small, independent units (unit tests, integration tests, UI flows). This promotes maintainability and faster runs.
Automate repetitive tests: Use automation for smoke tests, UI regression tests, consistent flows. Free up manual testers to focus on exploratory and edge-case testing.
Run across multiple devices and OS versions: Because of Android fragmentation, a test that passes on one device might fail on another. Use device clouds or a physical lab to cover breadth.
Monitor app performance and key metrics: Beyond functionality, look at app startup time, memory usage, battery consumption, responsiveness. Performance regressions impact user retention.
Use continuous testing in the CI/CD workflow: Integrate tests into your pipeline so that every code push triggers automated checks. Early detection of issues saves time and cost.
Prioritize tests by ROI: Not all tests are equal. Focus your automation on high-impact, high-risk areas. Use manual testing for exploratory, usability, device-specific quirks.
Regularly maintain and update test suites: Test scripts age just like code. Framework upgrades, UI changes or OS updates can break tests. Dedicate time to keep your tests relevant.
Get real-user context involved: Pair automated testing with real device/user testing (e.g., beta testing with actual users) to catch context-specific issues.
Use analytics & logs to feed testing: Monitor crash reports, user sessions, and feedback to identify weak spots in your app and tailor your tests accordingly.
By embedding these practices into your workflow, you'll build a testing strategy that not only safeguards quality, but also supports faster releases and higher confidence in your app.
Why use Baserock.ai Automate for Android Testing?
When you’re dealing with the complexity of Android apps—multiple devices, flows, OS versions—it helps to have intelligent tools in your corner. That’s where Baserock.ai comes in.
Here’s how Baserock.ai Automate simplifies Android testing for your team:
AI-powered, codeless test creation: Instead of hand-writing complex test scripts, Baserock.ai lets you design test flows visually. The AI handles script generation and maintenance, reducing boilerplate and fragile code.
Automatic script maintenance: As your app evolves (flows adjust), Baserock.ai’s automation adapts your test scripts, saving you the headache of constant rework.
Seamless CI/CD integration: Baserock.ai integrates with your existing pipelines, triggering test runs automatically during builds or deployments. This embeds Android testing into your DevOps workflow.
Accelerated release cycles: By automating high-coverage tests and reducing manual maintenance, you can ship updates faster, with confidence that your app works across devices.
Better ROI on testing efforts: With less manual scripting, fewer maintenance costs and broader coverage, you maximise your QA investment.
If you’re looking to future-proof your Android app quality assurance and reduce time-to-market while keeping quality high, Baserock.ai Automate is a smart choice.
Q1. Which tools are best for Android app testing in 2025? A: It depends on your app’s stack and needs. For pure Android apps, Espresso is a strong native choice. If you need cross-platform or multi-language support, Appium fits well. If you use React Native / JS stack, Detox may work. For system-level or device-wide tests, UI Automator is ideal. Choose tools based on your team’s skills and app architecture.
Q2. How can I start Android testing for my app? A: Begin by setting up a testable architecture in Android Studio. Write simple unit tests (e.g., data layer), add a UI test (e.g., login flow), set up a few emulators/real devices, and integrate that into a CI pipeline. Gradually expand into integration, performance and security tests.
Q3. What are the main types of Android testing? A: The key types include: unit testing, UI testing, integration testing, performance testing, security testing and usability testing. Each addresses a different layer of quality and risk.
Q4. How do I deal with device fragmentation in Android testing? A: Use a mix of emulators and real devices covering key OS versions, screen sizes and manufacturers. Leverage cloud device farms for broader coverage. Prioritise devices by market-share or user base.
Q5. What is the role of automation in Android testing? A: Automation enables repeatable, fast, scalable tests—especially regression, UI flows and high-coverage checks. Manual testing still matters for exploratory, usability and edge-case scenarios. The best strategy blends both.
Q6. How does Baserock.ai Automate differ from traditional test frameworks? A: Unlike hand-coded frameworks, Baserock.ai offers AI-driven, codeless automation, automatic maintenance of tests and real-device testing at scale. It integrates seamlessly with CI/CD and accelerates release cycles while lowering maintenance overhead.
Conclusion
Android testing is no longer optional—it’s fundamental to delivering high-quality apps in 2025. Whether you’re dealing with multiple devices, diverse OS versions, or demanding users, a strong QA strategy underpinning your development process is what makes the difference between an app that succeeds and one that falters.
By understanding what Android testing means, using the right mix of testing types, selecting appropriate tools, setting up your environment properly and following best practices, you’re putting your app in a strong position. And by choosing a platform like Baserock.ai Automate, you can further streamline your efforts, accelerate releases and maintain high confidence in your app’s quality.